Crafts & making · Heritage & traditional crafts
Upholstery
Almost everything written for amateurs is about the last ten per cent: choosing a fabric and stapling it on. The craft is the other ninety — what is under the cover, why the seat sagged, and whether the frame is worth the money you are about to spend on it. This page covers the structure, the two quite different traditions of doing it, the legal position on fire safety that reaches re-upholstery, and the honest arithmetic of when a piece is not worth saving.
Also known as furniture upholstery, reupholstery, re-upholstery, upholstering, chair recovering, traditional upholstery.
A traditionally upholstered seat is a structure, and understanding it as one is the difference between a repair that lasts thirty years and a cover that looks lovely and sags in eighteen months. From the frame outwards, the layers each do a distinct job, and each is supported by the one beneath.
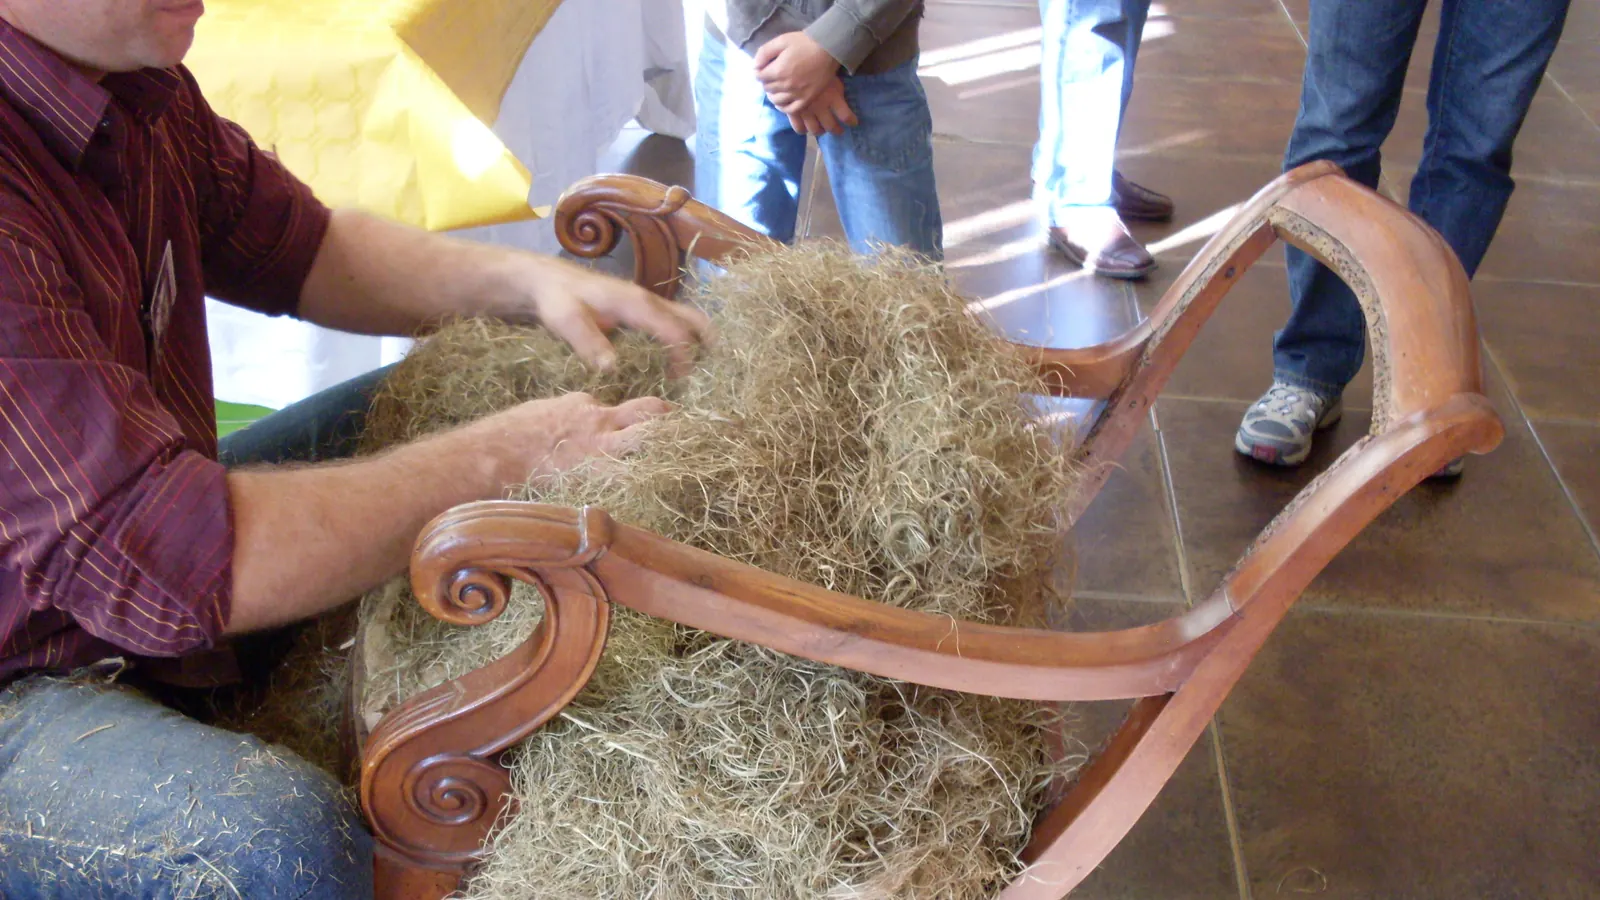
Webbing carries the load and is stretched across the frame under real tension. Springs, where they exist, sit on the webbing and are lashed to one another so the seat compresses evenly rather than in a hollow. Hessian covers the springs, stuffing goes over that, and a second hessian layer holds the stuffing in shape. Then wadding softens the surface, and the top cover goes over everything and is the only part anybody sees.
The reason chairs fail is nearly always in the first two layers. Webbing perishes and stretches; spring lashings break; and once one goes, the load redistributes onto its neighbours and the failure accelerates. A cover replaced over failed webbing is a cosmetic exercise, which is what most amateur re-covering turns out to be.
- The two traditions
- Traditional and modernSprings, horsehair and tacks; or foam, fibre and staples. Different skills, both legitimate.
- What usually fails
- Webbing and spring lashingsNot the fabric, which is why re-covering alone rarely fixes a sagging seat.
- Sensible first project
- A drop-in dining seatCarries most of the skills, weighs nothing, and costs under £30 to get wrong.
- The thing to check first
- The frameLoose joints and woodworm decide whether the piece is worth any of this.
- Still deciding — Upholstery vs chair caning
The most valuable skill in this craft is walking away, and it is the one no beginner has. A great deal of second-hand furniture is not worth restoring at any price, and the assessment takes ten minutes if you know what you are looking at.
What to check, in order of how likely it is to end the conversation:
Step 1: Sit in it and rock it
Sideways, then front to back. Movement in the frame means loose joints, which must be reglued before anything else happens — and on a piece that has been repaired badly with screws and brackets, that can be more work than the upholstery.
You will know it worked when: You know whether you are also doing a furniture repair.
Step 2: Look underneath
Turn it over. You can see the webbing, the tack rail, previous repairs and any woodworm flight holes in about thirty seconds, and this is where the honest condition lives.
You will know it worked when: The structural condition, before any fabric is removed.
Step 3: Check the tack rails
The frame timber that tacks and staples go into. A rail that has been tacked five times over a century is chewed to pulp and will not hold a sixth, and repairing or replacing it is skilled woodwork rather than upholstery.
You will know it worked when: You know whether the frame can still be fixed to.
Step 4: Press the seat in several places
A hollow in the middle is failed webbing or broken lashings. A hard spot is a spring that has come through its hessian. Both are normal and both mean a full rebuild rather than a re-cover.
You will know it worked when: A realistic idea of how far down you are going.
Step 5: Measure for fabric before you fall in love
Count the panels, measure generously, add for pattern matching. A wing chair swallowing eight metres of £60 fabric is a £480 decision, and it is worth making before the chair is in the car.
You will know it worked when: The real cost, rather than the price of the chair.
Step 6: Ask what it is worth to you
A chair with no sentimental value, a poor frame and an expensive fabric requirement is a bad project regardless of how cheap it was. The good projects are pieces that are either genuinely well made or genuinely loved.
You will know it worked when: A decision made on purpose.
One habit is worth adopting from the first project and almost nobody does: photograph everything as you strip it, from every angle, and keep the old cover pieces. Stripping destroys the only record of how the thing was made, and the old panels are the pattern for the new ones. People who skip this spend the rebuild guessing at what they took apart three weekends ago.
Almost every argument in this craft comes from the fact that two quite different methods share one name. Neither is wrong; they suit different pieces and produce different results, and knowing which one a piece was built to is most of knowing how to rebuild it.
- Traditional upholstery — Webbing, coil springs lashed by hand, hessian, horsehair or coir stuffing, stitched edges built up with twine to make a firm roll, wadding, and a cover fixed with tacks. Slow, repairable, extremely durable, and the correct approach for anything with a frame worth preserving. The stitched edge is the skill that separates the craft from the hobby.
- Modern upholstery — Elasticated webbing or a sprung unit, foam of a chosen density, polyester wadding, and a cover fixed with staples. Faster by an order of magnitude, entirely appropriate for mid-century and contemporary pieces, and much easier to learn. It is not a cheap imitation of the traditional method — a 1960s chair was built this way and should be rebuilt this way.
- Recovering — Replacing only the top cover over sound understructure. Legitimate and quick where the structure genuinely is sound, and the commonest way an amateur project goes wrong is by assuming it is.
The order of a full traditional rebuild, which is also the order of learning it:
Step 1: Strip, methodically and in reverse
Cover, then wadding, then stuffing, then hessian, then springs, then webbing. Photograph each layer as it comes off and keep the cover panels. A ripping chisel and mallet lift tacks along the grain rather than across it; going across splits the rail.
You will know it worked when: A bare frame, a set of patterns, and a photographic record.
Step 2: Repair the frame
Reglue loose joints properly — apart, cleaned, and cramped — rather than driving screws through them. Deal with woodworm before anything soft goes back on.
You will know it worked when: A frame that is rigid and sound.
Step 3: Web the seat
Under real tension with a web strainer, interwoven, tacked and folded back for a second row of tacks. This is the layer that carries everything and the one beginners under-tension, because the required force feels excessive until you have felt a correct one.
You will know it worked when: A drum-tight base that barely deflects under hand pressure.
Step 4: Set and lash the springs
Sewn to the webbing, then lashed to each other and to the frame with laid cord so they compress together and cannot lean. The lashing tension sets the seat profile, and this is the step that most rewards being shown rather than read about.
You will know it worked when: Springs that move as one surface.
Step 5: Hessian, first stuffing and stitched edge
Hessian over the springs, stuffing teased and packed evenly, then the edge built and stitched with a twine roll to give the seat a defined firm perimeter. The stitched edge is the part that takes years to do well.
You will know it worked when: A seat with a firm edge and an even crown.
Step 6: Second stuffing, wadding and calico
A finer stuffing layer, a calico under-cover pulled tight to consolidate the shape, then wadding to stop the stuffing working through. The calico stage is what makes the top cover easy.
You will know it worked when: The finished shape, before anybody sees it.
Step 7: Top cover and trim
Cut from your patterns with the grain and pattern running correctly, fitted from the centre outwards, tensioned evenly, and finished with piping, braid or close nailing.
You will know it worked when: The ten per cent everybody photographs.
The single most transferable piece of technique is that everything is worked from the centre outwards and tensioned in opposing pairs — front then back, then left then right. Fabric fixed along one edge first will always pull crooked, and no amount of subsequent adjustment recovers it.
What you genuinely need for a first project:
- Ripping chisel and mallet — For lifting tacks without destroying the rail. A wooden mallet, not a steel hammer — the chisel is meant to be struck by something softer than itself.
- Tack hammer — Light, with a magnetic face so a tack can be started one-handed. The magnetic end is not a gimmick; the other hand is holding the work.
- Web strainer — The tool that makes correctly tensioned webbing possible. There is no hand-strength substitute and this is the one tool not to improvise.
- Regulator — A long steel pin for moving stuffing about under hessian without opening anything up. Deeply unglamorous and used constantly.
- Skewers and needles — Upholstery skewers for holding fabric while you decide, plus a curved needle and a long double-ended straight needle for stitching edges.
- Staple gun — Manual to start with. An electric or pneumatic gun is the single biggest quality-of-life upgrade in the craft and is worth having before a second armchair.
- Shears — Long, sharp, and used for nothing but fabric ever. The rule is absolute and every workshop enforces it.
| Material | Job | Typical cost |
|---|---|---|
| Jute webbing | Carries the entire load of the seat | £1–£3 per metre |
| Coil springs | Even compression across the seat | £2–£5 each |
| Laid cord | Lashing springs to each other and the frame | £10–£20 a roll |
| Hessian | Separating layers and containing stuffing | £4–£8 per metre |
| Horsehair or coir | Traditional stuffing — resilient and repairable | £15–£40 per kg |
| Foam | Modern stuffing, specified by density and thickness | £20–£60 per sheet |
| Polyester wadding | Softening the surface, stopping fill working through | £3–£6 per metre |
| Calico | Under-cover that sets the final shape | £4–£7 per metre |
| Top fabric | The visible cover, and the dominant cost | £15–£100+ per metre |
| Tacks and staples | Fixing everything to the frame | £5–£12 a box |
| Piping cord and braid | Finishing the edges and hiding the fixings | £2–£10 per metre |
Fabric selection is where most of the money and most of the regret live. Upholstery-weight cloth is a different thing from dress or curtain fabric — it is tested for abrasion resistance, usually quoted as a rub count, and a dining chair in a busy house needs a materially tougher cloth than a bedroom occasional chair. Buying a beautiful furnishing fabric that is not rated for seating is the classic first mistake, and it shows within two years at the front edge.
- Work it out — Upholstery fabric estimator
Working from what the chair is doing to what is actually wrong:
| Symptom | Usual cause | What it means for the work |
|---|---|---|
| Seat sags in the middle | Perished or stretched webbing | Full strip of the seat. A re-cover will not touch it. |
| A hard lump under the seat | A spring pushed through its hessian, or a broken lashing | Seat down to the springs; relash and re-hessian. |
| Creaking or rocking | Loose frame joints | A furniture repair first — reglue properly before any upholstery. |
| Front edge collapsed and rounded | Failed stitched edge, or foam broken down at the crown | Rebuild the edge. This is the structural part of the seat profile. |
| Cover pulling into diagonal creases | Uneven tensioning, or fabric fixed one side at a time | Off and on again. There is no adjustment that fixes a diagonal pull. |
| Buttons sinking or popping | Twine cut through the wadding, or wrong twine used | Redo the buttoning with the correct twine and a backing. |
| Tacks will not hold | Tack rail chewed out by previous re-upholstering | Frame repair — let in new timber or a new rail. Skilled woodwork. |
| Musty smell that will not clear | Damp in the stuffing, or vermin | Strip out and replace the fill. Nothing rescues contaminated stuffing. |
A sensible order of projects:
- Drop-in dining seat — A frame, some webbing, a pad and a cover. Teaches tensioning, cutting and fitting in one evening for under £30.
- Footstool or ottoman — Adds a boxed shape, corners and piping — which is where fabric handling actually gets learned.
- A simple bedroom chair — The first piece with an inside back and an outside back, and therefore the first that requires thinking about the order of assembly.
- A sprung dining or occasional chair — The first springs and the first stitched edge. This is the step where most people take a course, and it is the right instinct.
- An armchair — Arms, wings, scrolls, and a great deal of fabric. A serious project and the point at which the craft becomes properly satisfying.
- Restoration to a standard — Working sympathetically on pieces of genuine age, which brings in materials research, frame repair and knowing when to conserve rather than replace.
Two things accelerate progress far more than practice alone. The first is a course, even a short one: the stitched edge and the spring lashing are both skills where somebody watching your hands for an hour saves months, and a great many further-education colleges and independent workshops run them. The second is stripping other people’s work — every chair you take apart is a free lesson in how somebody else solved a corner, and it is the closest thing the craft has to reading a manual.
This is the part of the craft that almost no amateur writing mentions, and it matters both because it is a legal duty for anybody doing it commercially and because the exemption in it is genuinely useful to a hobbyist restoring old furniture.
The Furniture and Furnishings (Fire) (Safety) Regulations 1988 set ignition-resistance requirements for domestic upholstered furniture: filling materials must meet ignitability standards, permanent covers must pass a match test unless certain conditions apply, upholstery must pass a cigarette test, and compliant items must carry labels. The requirements reach people who supply filling materials and fabrics, and people who supply furniture or re-upholstery services.
For somebody re-covering their own dining chairs and keeping them, none of this creates a duty. It is still worth knowing, because it explains why upholstery suppliers ask what the piece is and why compliant foam and interliner cost what they do — and because the moment a hobby starts selling, the position changes completely.
The tools are ordinary workshop hazards and behave accordingly: tacks in fingers, a staple through a fingertip, and a ripping chisel that skids off a rail. Sharp shears, work held in a clamp rather than a hand, and never driving a staple towards yourself covers almost all of it.
What is less obvious is that stripping old furniture releases a century of accumulated dust, and that a narrow band of twentieth-century pieces contains materials worth treating with care.
The rest, briefly:
- Tacks everywhere — They end up on the floor and then in feet and pets. Sweep with a magnet after every stripping session, not at the end of the project.
- Lifting — A sofa is a two-person job and a wing chair is heavier than it looks. Most upholstery injuries are backs rather than blades.
- Adhesives — Spray adhesives for foam are solvent-based and need real ventilation. Read the label rather than assuming a craft product is benign.
- Old finishes — Sanding or stripping the show wood on an old frame is a different activity with its own hazards, and older paint layers are worth testing before disturbing.
- Pneumatic tools — A compressed-air staple gun drives a staple through a fingertip without noticing. Keep the trigger hand clear and disconnect the air before clearing a jam.
A rebuilt piece will outlive the person who rebuilt it if the understructure was done properly, and the maintenance that keeps it there is almost entirely about the cover and the cushions rather than about anything structural.
What actually extends the life of the work:
- Turn and rotate the cushions — Every few weeks. A seat cushion used one way up in one position wears in one place and collapses years before its neighbour, and rotation is the single cheapest thing on this list.
- Vacuum rather than brush — Grit is an abrasive. It works into the weave and cuts the fibres from inside every time somebody sits down, which is why the arms of a neglected chair go before the seat.
- Keep it out of direct sun — Ultraviolet light fades dye and degrades fibre, and it does both unevenly. A chair with one faded arm is a chair by a window.
- Treat a spill immediately, and blot — Rubbing drives it into the pile and spreads the mark. Test any cleaner on a hidden seam allowance first — some remove the dye faster than the stain.
- Re-tension before it sags — Webbing is the layer that fails first and it fails gradually. A seat that has begun to dip is far quicker to put right than one that has collapsed onto its springs.
- Keep the offcuts — A metre of the same dye lot, labelled with the date and the supplier, is worth more in five years than it costs today. A later repair patched from a different roll is visible from across the room.
- Check the frame joints annually — Thirty seconds of rocking it. A joint caught while it is merely loose is a glue-up; the same joint left for two years has worn its mortise oval.
Two things are worth knowing about cleaning specifically. Upholstery fabrics carry a cleaning code from their manufacturer indicating whether they tolerate water-based cleaners, solvent only, or neither, and ignoring it is how people bleach a stripe across an arm. And professional cleaning is cheap relative to recovering — if you are weighing one against the other, have it cleaned first, because you cannot un-recover a chair.
- Starting with a wing chair — The most complicated shape in domestic furniture, chosen because it is the one people have. A drop-in dining seat teaches most of the same skills in an evening.
- Re-covering over failed webbing — The cover looks perfect and the seat sags within a year, and the fabric has to come off again to fix it properly.
- Under-tensioning the webbing — The correct force feels violent until you have felt it done right. Webbing that gives noticeably under a hand is not tight enough.
- Not photographing the strip — Then reaching the rebuild with no record of how the layers went together or how the corners were folded.
- Throwing away the old cover — It is the pattern. Cut the new panels from the old ones rather than from measurements.
- Buying furnishing fabric for a seat — Beautiful, not rated for abrasion, and visibly worn at the front edge inside two years. Check that the cloth is sold for upholstery.
- Ignoring pattern direction and repeat — A stripe that runs the wrong way on the inside back, or a repeat that does not align across a seat and a cushion, is the tell of an amateur job even when the work is otherwise good.
- Fixing one edge fully before tensioning the others — Everything is tensioned in opposing pairs from the centre outwards. Committing one side first bakes in a diagonal pull that cannot be corrected.
- Webbing
- Woven jute or elasticated strapping stretched across the frame under tension. The layer that carries the load of a seat.
- Web straineralso: webbing stretcher
- A lever tool that pulls webbing to working tension against the frame while it is tacked. There is no hand substitute.
- Hessianalso: burlap
- Coarse open-weave jute cloth used to separate layers and contain stuffing.
- Stitched edgealso: roll edge
- A firm roll built along the front edge of a traditional seat with rows of twine stitching, which defines the seat profile and stops the edge collapsing.
- Regulator
- A long steel pin used to redistribute stuffing beneath hessian without opening the work up.
- Ripping chisel
- A blunt chisel struck with a mallet to lift old tacks along the grain of the rail rather than across it.
- Tack rail
- The frame timber that tacks and staples are driven into. Repeated re-upholstering chews it out, and a failed rail is a woodwork job.
- Calico
- A plain cotton under-cover fitted over the stuffing to consolidate the final shape before the top cover goes on.
- Scrim
- A fine open-weave cloth laid over the first stuffing, through which the edge is stitched.
- Laid cord
- Heavy non-stretch cord used to lash coil springs to each other and to the frame so they compress as one surface.
- Rub countalso: Martindale, double rubs
- A measure of a fabric’s abrasion resistance from standardised testing, used to judge whether a cloth suits heavy or light seating use.
- Show wood
- The visible timber of a frame — arms, legs, a chair back — which is finished as furniture rather than covered.
- Deep buttoning
- Buttons pulled through the stuffing on twine to create a regular pattern of hollows, with the fabric pleated between them.
The trade is conventionally understood to have developed out of the work of coffer-makers and tapestry hangers, with padded seat furniture becoming steadily more elaborate through the seventeenth and eighteenth centuries as the techniques for building and holding a shape improved. The details of that development are a specialist study and accounts vary; what is uncontroversial is that the coil spring, introduced to seat furniture during the nineteenth century, changed the craft more than anything before or since.
Before springs, comfort came from the depth and quality of the stuffing and from the skill of the stitched edge. Afterwards, a seat could be genuinely deep and resilient, and the characteristic buttoned, sprung furniture of the Victorian period followed. The methods used to build those pieces are essentially the methods still taught as traditional upholstery, which is why a competent restorer can take a 150-year-old chair apart and put it back together with materials bought this morning.
The twentieth century added the second tradition rather than replacing the first. Foam, staples and manufactured spring units made furniture far cheaper to produce and much faster to upholster, and they are the correct approach for the furniture built with them. The consequence for the hobby is the one that confuses beginners most: two entirely different bodies of technique are both correct, and which one applies is decided by the piece in front of you.
Sources for this section
- Crafts Council (opens in a new tab) — Crafts Council · Institutional · could not be reached
The craft sits across a trade and a hobby, and the two have quite different instincts. Trade upholsterers work to a price and a deadline and are entirely comfortable with staples, foam and modern methods where the piece calls for them. Hobbyists, particularly those who came to it through old furniture, often prize the traditional methods for their own sake. Both positions are defensible and the argument between them is one of the more tedious features of the online craft.
A more interesting question, and one the restoration end of the craft takes seriously, is how far to go. A chair rebuilt entirely with new materials in the traditional manner is a functional chair with a old frame; one where the original stuffing is conserved and only the failed elements replaced retains more of what it was. Museums and conservators think about this carefully. For domestic furniture nobody expects that standard, but the question is worth asking on anything genuinely old, because stripping is irreversible.
The practical culture is generous and heavily local. Foam converters, fabric wholesalers and traditional materials suppliers are mostly small businesses who will talk at length to somebody buying eight metres, and the fastest route into the craft is usually a person rather than a website.
- What should my first project be?
- A drop-in dining seat — the pad that lifts out of a dining chair frame. It carries most of the fundamental skills, in that you strip it, web it, pad it and cover it, and the whole thing takes an evening and under £30 of materials. If it goes wrong you have lost an evening. The instinct to start with the wing chair in the spare room is understandable and wrong: it is the most complicated shape in domestic furniture, it needs seven to nine metres of fabric, and getting it wrong is expensive in both money and morale.
- Can I just replace the fabric without doing the rest?
- Sometimes, and it is worth checking properly rather than hoping. Turn the piece over and look at the webbing: if it is intact and tight, and the seat does not sag or have a hard lump in it, then re-covering over sound understructure is a legitimate and much quicker job. If the seat dips in the middle, that is failed webbing or broken spring lashings, and no amount of new fabric touches it — you will simply have a beautiful cover over a chair that still sags, and it will have to come off again to fix properly.
- How much fabric do I need?
- It varies enormously by piece and it is worth measuring rather than guessing. As rough orientation: a drop-in dining seat takes well under a metre, a small bedroom chair one and a half to two and a half metres, a wing chair seven to nine, and a two-seater sofa ten to fourteen. Add substantially for a pattern with a repeat, because every panel must align and you will waste cloth between them, and add for a directional fabric or a velvet where the pile must run the same way on every piece. Measure the largest panel in each direction, count the panels, and buy generously — a second cut from a different roll is a different dye lot.
- Do fire safety regulations apply to me?
- Not if you are re-covering your own furniture and keeping it. The Furniture and Furnishings (Fire) (Safety) Regulations 1988 reach people supplying furniture, filling materials, fabrics and re-upholstery services, and they contain a precise exemption: they do not apply to the supply of goods made before 1 January 1950, nor to materials intended for re-upholstering furniture made before that date. Two cautions. The date is the date — a 1965 chair is inside the regime. And the moment you sell what you have made, or do it for somebody else for money, the position changes entirely and is worth taking advice on, because the regime has been amended repeatedly since 1988.
- Is horsehair stuffing safe to work with?
- Handled sensibly, yes, and it is a genuinely superior material — resilient, long-lived and repairable in a way foam is not. The real issue is not the hair but the dust: a century of accumulated debris comes out with it, and stripping should be done outdoors or with ventilation and a fitted mask rather than a paper one. Clear the debris with a vacuum rather than a brush, because dry sweeping puts settled dust straight back into the air. Old stuffing that is damp, musty or shows signs of vermin should be replaced rather than reused, and nothing rescues contaminated fill.
- How long does an armchair take?
- For a first full traditional rebuild, expect thirty to sixty hours spread over several months, and expect the distribution to surprise you. Stripping is quick and satisfying. The frame repair, the webbing and the springs go faster than you fear. The stitched edge takes as long as everything before it combined the first time you do one, and the top cover — the part everybody imagines the craft to be — is perhaps a fifth of the total. A modern-method rebuild with foam and staples on a comparable chair is perhaps a third of that time.
- Is it worth taking a course?
- For traditional work, yes, and it is the single highest-value thing you can do. Spring lashing and the stitched edge are both continuously judged by feel — how much tension, how firm the roll, when to stop — and an hour of somebody watching your hands genuinely does replace months of guessing from photographs. Modern-method upholstery is much more learnable from written instruction because the decisions are more discrete. Further-education colleges, independent workshops and a good many practising upholsterers run short courses, and a single day on springs and edges is usually money well spent.
If you like this
Each of these is here for a stated reason, not because it is also a hobby.
Similar to
- Corsetry — Structure under tension, hidden engineering and a covering that must not reveal what is underneath — upholsterers and corsetmakers recognise each other’s problems immediately.
- Classic car restoration — Interior trim work is upholstery under another name, and the temperament is identical: patient reversal of somebody else’s bodged repair, with the satisfying part hidden under the visible one.
Goes well with
- Antique collecting — Learning what is inside a chair is learning to date and value one, and the restoration question — how far to go before a piece stops being what it was — is the same argument in both hobbies.
- Wood finishing — A reupholstered chair almost always needs its show wood dealt with as well, and the two jobs meet on every piece of furniture that has both.
- Furniture making — Every serious upholstery project turns into a frame repair at some point, and the two crafts meet at exactly that joint — one builds the structure, the other decides whether it can still be fixed to.
Shares equipment with
- Sewing — Cutting, pattern-matching and seam work are the same skills in heavier cloth, and piping, boxed cushions and loose covers are straightforwardly machine sewing done on upholstery weight fabric.
Sources for this section
- The Furniture and Furnishings (Fire) (Safety) Regulations 1988, explanatory note (opens in a new tab) — UK Government (legislation.gov.uk) · Governing body · read — supports the claim
- Construction dust: sweeping and cleaning (opens in a new tab) — Health and Safety Executive · Governing body · read — supports the claim
- Crafts Council (opens in a new tab) — Crafts Council · Institutional · could not be reached
Comprehensive
Last reviewed 2026-08-14. Cost, time and difficulty figures on this page are HobbyHQ estimates — see how we work. Something here wrong or out of date? Tell us.